Showing posts with label WIP. Show all posts

Monday, September 12, 2016

Gundam Project Update

I went missing for a month plus...sorry. I made a pledge to continue blogging this time around, and I intend to fulfill that pledge. For the last month or so, other than usual work issues, I got overwhelmed by the deadline for the August event at Animaganki. In short, the core things that I wanted to do with this model was completed about a day before submission date. The initial plan to add some overbrush, some hard-edge highlights, some sponging weathering, and build a proper terrain diorama. However, one day was not enough to do either of those. Therefore, I decided to stop being ambitious and just submit the model as it was.

I'm going to start by updating a bit my previous project WIP; plastic piping. In short, it's a plasticard technique to alter the appearance of certain parts of a kit. This was the before-and-after picture of my first attempt on a shoulder piece.


I have never thought that putting two plasticard can alter the appearance by a lot. Suffice to say, I got the ball rolling since I was happy with the results. These waist parts were my next attempt.


Next up, upper and lower torso.


Due to some twisted inspiration, the body ended up looking like this.


After some painting in Magneto's colour scheme and applying warlock-like runic decals, the parts looked like these.


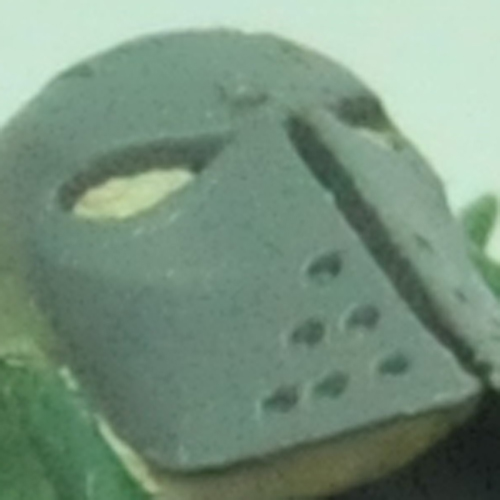
And the end product looked like this. (The display base was lackluster, sorry for the lame effort on this part.)


That's a rusted old gunblade on his right hand and the intended pose was to indicate "You're next!". The grinning teeth marking was painted freehand over the helmet.

Summary of parts used:
1. MG Gundam AGE-1 Spallow - core model
2. HG Hi-Mock arms - upper arms
3. HG Denial Gundam thigh piece - lateral side skirts
4. HG Ballden Arms - shoulder missile pod & missing ankle joint replacement 
5. unknown rifle piece courtesy of Blackbase Hobby Shop (Thanks!)
6. a random piece I found for the chest mini-gatling guns
7. GW Basilica Administratum kit - chest piece
8. GW Orks bit - rifle scope
9. GW Eldar bit - gemstones on chest and thigh
10. GW Storm Raven bit - thrusters under the lateral side skirt
11. various plasticards

(Wow! I honestly didn't realise that there were a lot of parts used until I wrote them down here.)

My efforts were awarded with a Merit recognition. After conversing with the judges, I discovered that I scored very high on Creativity, slightly below average on Workmanship, and the bare minimum for Display. If I added a bit more effort on the display base, I would've earned the Bronze recognition. In addition, if my scribing were tidier and my airbrushing was more even, I would've earned the Silver recognition. Nevertheless, I'm already happy with the end result and very glad to receive a lot of pointers on how to further improve myself. Adding to that happiness, I was ecstatic that my work was selected as one of the five judges' favourite; the judge that selected mine was from Modelland Workshop. Thank you very much for the recognition, I really appreciate it! Thank you for the MG Force Impulse Gundam too!


Next projects: (1) Design-and-paint one marine from a custom Space Marine chapter by October 8, (2) Build a diorama display for the GW Armies of Parade on October 15, and (3) a HG-sized Gundam for the year-end event on end of November.

Do note that I've signed up for the Armies of Parade with my Wood Elves. Yes, Wood Elves...not Aelfs, and definitely none of the Wanderers and Sylvaneth nonsense. I'm going to bring everyone back to Athel Loren, and I'm going to enter this event in a Legio Malaysia uniform. It's about time for Legio Malaysia to make a comeback, we've been in stasis for far too long.

Now, to look for a chopped off tree trunk/stump that is 2 feet in diameter...

Tuesday, July 26, 2016

Scribing Circular Shapes

In my last post, I've mentioned about attempting to scribe circular shapes. As it turns out, not to be a good idea at my current skill level for the following reasons:

  1. Scribing circles and freehand does not go together. Templates are required, more especially so since I have minor hand tremors.
  2. DYMO tapes are insufficient as template/guide for scribing circular shapes, since it requires a larger surface area to stick around the area that you are planning to scribe.
  3. Custom-made templates out of plasticard does not work as it'll get cut easily during the scribing process. Metal templates are most definitely the tool of choice. (Thus, postponing this wild idea inside my head of scribing flames on the model)

Thus, after some trial-and-errors, this is the end result from my attempt to scribe circular shapes. There are no 'before' pictures as it was a completely blank surface. You probably noticed that the circles are slightly off-centred with visible scratch marks. I wonder if filling the scratch marks with epoxy putty will solve it. Otherwise, gonna disguise it as battle damage during painting later..hahaha 

I do admit that it looked a bit Necron-ish. Most probably due to my subconcious thoughts, which is heavily influnced by the WH40K universe. Overall, I think it doesn't look that bad..hahaha (trying to cheer myself up, LOL).

So, I've tried scribing. It was a mediocre attempt, but at least I've tried it and got the feel of it a bit. Will definitely seek more knowledge on how to improve myself on this skill later. The next recommended step after scribing would be learning the chiseling technique, but I'll postpone that until my scribing becomes more stable. Gonna try something else simpler first. So, next up on the list of new modelling techniques to try: plastic piping.


Tuesday, July 5, 2016

Learned Something New - Scribing

Scribing is an old modelling technique which I never knew. The main purpose is break the monotony of parts with large surface area. Having dealt with highly detailed single-posed miniatures before, there was never a need to actually do so, until now.

The Tau armour is an excellent example of an end product on which scribing can be applied. Looking at it closely, the Tau armour is basically flat-surfaced armour plates with grooves cut into the armour. Examining the armour, we can see that there were no added height and thickness to the armour plates.

Scribing is basically the technique to emulate the grooves, in order to add dimensions to the models. As for tools, there aren't any specific ones; blade, nail, chisel or slot-head screwdriver can all be used to achieve the desired effect. Since I just discovered this technique, apparently there are a lot (and I do mean, a lot) of tutorials on scribing posted all over the internet and youtube. There are so many of them that it would be pointless to provide you with URL links for it. I guess the age-old saying was right; you need to know what to look for before looking for anything.

This new revelation made me very curious to try it. This below, is my first attempt at scribing, done on my WIP entry for the Gundam event in August.


Additional panel lines were scribed to these side skirts parts. Just by adding a few groove lines, the part looked upgraded. This is probably nothing new to most of you but for me, it is. If only I knew about this technique on my previous conversion projects. Lesson learnt: there will always be something new to learn.
(Note: on hindsight, a 'before and after' picture would be more favourable)

Definitely need more practice to brush up this new skill, will try circular shapes next.

Monday, April 8, 2013

Army Throwdown WIP Update: Wild Card #1

My Plan A was to enter the Harlequins as my first Wild Card, but I got carried away in painting the Wave Serpent below. During the weekend, I was stuck in between; couldn't decide whether to finish the Harlequins or the Wave Serpent.


Browsing through the web, I stumbled upon an interesting technique. Which leads me to create my own stencil as below. We'll see whether I can pull this new technique off by this Friday.


Wednesday, January 16, 2013

Army Throwdown: Troops #1 Update

The original plan was to add some checkerboard patterns onto random sections of the Wave Serpent, then finishing them off with some airbrushing on the pattern edges to represent a 'Harlequin Energy Field'. The reality was that I was not that skilled yet and ended up with a mishap. I also kept a poor track on time, was too caught up with the skimmer.

Only the left side of the Wave Serpent is presentable at the moment.  I don't know what I'm able to do for the right side in the next two nights. Plus, the Dire Avengers still need more work. Wishing for an inspiration to pull out a miracle.

The throwdown is three days away, while I only have two nights to work on them. Wish me luck! 

Thursday, January 10, 2013

Entry for the Legio Army Throwdown 1, Take 2

After digging very deep into the 'Black Library' in my house, I found even more unpainted Eldar stuff in my possession. Thus, the amendment to the previous army/painting list that I've submitted.
 
HQ: Autarch + Mandiblasters, Power Weapon
HQ: Autarch + Mandiblasters, Power Weapon, Fusion Gun, Warp Jump Generator
Troops: 5 Dire Avengers + Wave Serpent, Shuriken Cannon
Elite: 5 Fire Dragons + Wave Serpent, Shuriken Cannon
Elite: 10 Harlequin + Shadowseer, Troupe Master, 2 Fusion Pistol, 9 Harlequin's Kiss
Elite: 7 Harlequin + Shadowseer, Troupe Master, Death Jester, 2 Fusion Pistol
Fast Attack (IA11): 3 Wasp Assault Walker + 6 Scatter Lasers
Fast Attack: Vyper + Scatter Laser, Shuriken Cannon
Fast Attack: 10 Warp Spiders, Exarch, Powerblades, 2 Death Spinners, Surprise Assault
Heavy Support: Wraithlord + Brightlance, Starcannon
Heavy Support: Support Weapon Platform, D-Cannon + Warlock, Singing Spear, Embolden
Total: 1994pts
 
 
Next post, update on one of the Wave Serpents: adding the checkerboard pattern.

Wednesday, January 9, 2013

Entry for the Legio Army Throwdown 1

If you've been paying attention, Legio Malaysia has posted up their plan of awesome activities for the first half of 2012. Initially, I wanted to enter two separate armies for the Army Throwdown and 40K League Season 4. Upon further consideration on the timeline, work schedule, and my marine-fatigue, I've decided to enter Eldar for both events. Same Craftworld, two different lists. By doing this, it'll allow me to (finally) have a fully painted Eldar army, with fully painted options should I decide to change lists in the future.
 
The following is my armylist for the Army Throwdown event, as these are the models that I have yet to complete the paintjob. Some are even still in sprue/blisters. Note: PaintedBasecoated (no layering nor highlights), Assembled, Unassembled.

Eldar - Craftworld Ilfirin 2000pts 
HQ: Fuegan
HQ: Autarch + Mandiblasters, Power Weapon
Troops: 5 Dire Avengers + Wave Serpent, Shuriken Cannon
Troops: 5 Dire Avengers, Exarch with 2 Shuriken Pistols + Wave Serpent, Shuriken Cannon
Troops: 3 Guardian Jetbike + Shuriken Cannon
Elite: 10 Fire Dragons, Exarch with Dragon Breath Flamer + Wave Serpent, Shuriken Cannon
Elite: 10 Harlequin + Shadowseer, Troupe Master, 9 Harlequin's Kiss, 2 Fusion Pistol
Elite: 7 Harlequin + Shadowseer, Troupe Master, Death Jester, 2 Fusion Pistol
Fast Attack (IA11): 3 Wasp Assault Walkers + 6 Scatter Lasers
Fast Attack: Vyper + Scatter Laser, Shuriken Cannon
Heavy Support: Wraithlord + Brightlance, Starcannon, 2 Flamers
Heavy Support: 1 Support Weapon Battery with D-Cannon + Warlock, Singing Spear, Destructor
Total: 2000 points, on the dot
 
This 'uncommon' armylist was made up to accomodate the event requirement and the models in my possession. However, I am considering them as my painting to-do list, as the armylist slightly deviates from my standard Eldar army list. Here's the current picture of the rag-tag army above, in various stages of painting and assembly.


There you have it; half-done Wave Serpents, pure white Dire Avengers, basecoated Fire Dragons, an assortment of bare metal and plastic, and of course, the pile of metal/plastic/resin at the far right. In the next few months, all of these (I strongly hope so) is going to be fully painted. Wish me luck!

Sunday, December 23, 2012

Returning Home Soon

My outstation duty was completed a day earlier, and I'm returning home today later in the evening. Due to unstable power source, I was unable to re-complete the Dungeon Siege 2 as originally planned. Luckily, I brought these along for something to work upon at night.


From all of the above, only ten were managed to be fully painted within this past 17 nights. Can't wait to base them when I reach home. See you guys later, ok!

Tuesday, July 31, 2012

Slow March

Compared to what my colleagues have done, I'm at a snail's pace. Pictured below is what I managed so far, pending the detail works. Painting metal colours straight on will be a bit off since it's too shiny, so perhaps I will use light off-grey for the metal parts.


Anyway, is the grey too dark or is it just nice? Feedbacks please, thanks.

Sunday, July 22, 2012

A Small Flames of War Update

Legio Malaysia has recently made it official that the Operation: Case Yellow campaign will start in September. In response to that announcement, this is what I had assembled as of this moment.


Those pictured above are approximately a third of my 1500pts list, which is as listed below:
  • HQ: 2 Panzer III
  • Platoon 1: 6 Panzer I B
  • Platoon 2: 3 Panzer III
  • Platoon 3: 4 Panzer I B + 1 Panzer II C
  • Platoon 4: 4 10.5cm IeFH18

Yes, you read it right. There'll be no secret to this project; it is a simple 16 tanks with 4 artillery guns Mittlere Panzerkompanie list. However, some of the other participants are considering to play 1750pts during the campaign. If that's the case, I may have to either add more Panzer III or a Luftwaffe AA artillery platoon. The 6-rad Recon halftracks actually came to my interest, but the cheapness in their points value doesn't go in line with the actual retail price, so I had to drop that plan. Putting that aside, I'm targetting August 24th for all those listed above to be fully painted.

Stay tune for more updates.

Thursday, March 15, 2012

Golden Kris 2012 WIP: Large Model Entry Unveiled

It's finally time to unveil the daemonic entity that has been plaguing the Glenmarie Sector. After several weeks of uncertainty, the mystery will be unleashed. The pain and suffering caused by the instability shall be rewarded with huge pleasure. Speaking of the daemon, here he is.

*No Raven Guard marine was harmed during the photoshoot, for scale purposes only.
Yes, this will be my entry for the Large Model category. Not really gunning for an over-the-top conversion and sculpting, but the processes do take a bit more time than initially predicted. I do have to apologize for displaying a monochromatic picture, was over-enthusiastic and forgotten to take a picture before applying the first layer of colour. Anyway, here are the complete version of the all the WIP pictures I've posted previously. Enjoy :)


Sunday, March 11, 2012

Golden Kris 2012 WIP Sneak Peek Part 3

Progress is good, the 'summoning' is going on smoothly. In a few days, the unveiling shall commence. Then, applying colours to the summoned one.


Saturday, February 11, 2012

Golden Kris 2012 WIP Sneak Peek Part 1

A WIP sneak peek on my entry for Golden Kris 2012, coming soon in June. Just as the cropped pictures below, the model itself is currently still on three separate parts (four, if you count the base too). Hope I can get a good progress over the weekend. Hmm..once it's fully converted/assembled/sculpted, I may need to bring the airbrush home, probably by mid March. Sorry Alvin, I think you better paint whatever you have as soon as possible. I'm not going to paint this guy in public, if I want to win something this year, gotta keep the "WOW" factor as a secret (right?).


Can anybody guess what it might be? ;p
Don't worry, you'll figure out within this four months time.

Tuesday, January 3, 2012

Armoured Monsters

This current post will feature a lot of tanks. First up, would be the only unit with an armour value in my WIP Minotaurs list; the Land Raider Achilles. As per fluff, Minotaurs are rather well-equipped with Mark VIII Power Armours, along with multitude of Predators and Vindicators. However, ever since Forgeworld put up a Minotaur-aligned LR Achilles, I'd simply fell to the lure and must make one myself.

However, it doesn't take away from the fact that it's a Land Raider Chassis, with its usual predicaments during assembly.

You guessed it, gaps and warps. Each and every single Land Raider I've assembled (FYI, this is the fourth) had the same problem, but I didn't found any similar complain from the community. Just my dumb luck, perhaps. After leaving it overnight, I ended up with this.
Finally, it's starting to look good. There's some unsightly gaps at the front panel, near the tracks which I need to cover up with Green Stuff. All in all, it's a good kit to look at when it's assembled. I later discovered however, that Vern (another fellow hobbyist) received a miscast of the multi-melta sponsons where the sponson slot was on the supposed outer side of the gun. Dude, if you want it to be assembled as per picture, I'd suggest you to drill through the slot and patch it up a bit with Green Stuff/epoxy putty.

This is what I have at the moment, and I just realized that my patching up work on the front plate was not up to standard. I guess I have to either repatch and repaint, or utilize the imperfection for battle damage. The later sounds more logical, what say you all?

Up until this point, this is how I painted this beauty.
Primer: Black, with an overbrush of White.
Basecoat: Two layers of GW Desert Yellow.
Primary Colour: Two layers of GW Dwarf Bronze
Secondary Colour: A light overbrush of GW Burnished Gold.

After bringing the model under a brighter light, it appeared that I may need to do at least another layer of Dwarf Bronze and redo the Burnished Gold overbrush. That being said, I may need some expert opinions on what I should do next. The way I do the infantry was to liberally wash them with Thraka Green and then a light wash of Hawk Turqoise. The question would be, should I do the same for the Land Raider? After all, it's a far bigger model than the infantry models.

Let's move on to second segment of this post, more tanks. One of my resolutions was not to start any new army in 2012, and therefore I had to cheat a bit; this army was started on December 27th, 2011. I was not too fond of WW2 history (personally, what's done is done), and therefore I need some strong triggers to start an army of this genre. The first one, was the location of Legio Malaysia, our gaming club, which is at the nearest possible proximity of Battlefront Miniatures. Second, support from fellow hobbyist. After months (years, perhaps) hearing the awesomeness of the game, slowly the interest grow within me. For this, I had to give credits to Jeff, Azlan, Iskazri, Khairul & Arzmi. The third and final trigger, credit was all Khairul's. He lend me some FoW books to read and gave me two tanks to paint. There was reluctancy to paint them at first, but after reading the books, they've totally won me over. The two Panther A tanks were an awesome start to my army.
That was the exact condition of the Panther A tanks that I received. Thanks to this also, I managed to get a rough idea regarding the base colour. There's only a limited pallette of VGC paints in my possession, the equivalent for this colour would be Tamiya Dark Yellow and GW Desert Yellow. The lesson I've learnt here was; gotta be creative in searching for equivalent colours, doesn't necessarily have to stick to only one brand. The next thing I did was, checking out the LGS for their FoW stock the next day. Lady luck was upon me as they happened to have 'some' Panther A in stock, and Jin Aun was also trying to sell off his Tigers for cheap and concentrate on his Russian army. These was the loot for the day.
Exactly six days after that, my army is 99% painted and ready for war. The remaining 1% would be the placement of decals/logo on the tanks, will consult the guys this hobby night regarding the matter. Listed below are the steps I took to paint them.


1. Primer: Black, with an overbrush of White.
2. Two layers of GW Desert Yellow.
3. A medium overbrush of GW Terracota.
4. Lining with GW Catachan Green. (Redid with Tamiya Olive Green since Alvin pointed out the green was too thin, thanks Alvin!)
5. Sponging with GW Boltgun Metal for battle damage.
6. Wash with 1:2:1 GW Chestnut Ink:Gloss Varnish:Water
7. Sponging with VGC German Grey over the Boltgun Metal areas to accentuate the wear and tear (Thanks to Alvin & Jeff!)
8. Random sponging of GW Desert Yellow.
9. A random light overbrush lining of GW Terracota.
10. A layer of 3:1:2  GW Charadon Granite:VGC Opaque Bluegrey:Water for the treads.
11. Drybrush the treads with GW Graveyard Earth, then GW Desert Yellow.
12. Picking up the details with these colours; GW Adeptus Battlegrey, VGC Charred Brown, GW Codex Grey, and GW Rotting Flesh before giving them some washes of GW Ogryn Flesh and GW Badab Black.

After all the steps above were done, these are what I ended up with...

And that's it, these thirteen tanks sums up to approximately 2500pts. By the way, this is my first time taking pictures of FoW minis. Would they do just fine or do I need to put shots of individual tanks? I do realize that I'll need a better background lighting since they're at a much smaller scale than what I usually do. Tell me what you guys think of it. Was thinking of painting either an Aufsklarung platoon or a couple of Pumas next, but let's just settle with these guys for now.